 |
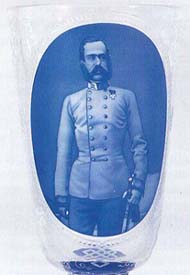
Kaiser Franz Joseph 1. |
 |
c. 1850, intaglio cut; Beaker,c. 1850, shaded wheel cut. |
by Ron Fox
In this article, I will be discussing the different methods which have been used to give the appearance of detailed scenes to glass steins. These methods include etching, cutting, scratching and engraving, and may be used alone or in combination.
Diamond Point Engraving
This was the earliest method used to decorate engraved glass, dating back to around the 16th century. The artist employed a diamond or a hard metal tool to scratch the glass surface with linear designs. All designs were surface decorations, as the limitations of the engraving tool prevented the artist from making deep or wide scratches. With the advent of copper wheel engraving, diamond point engraving became obsolete.
Stippling
This method dates about as far back as diamond point engraving and was similar in that it used the same diamond or hardened steel point to strike the glass. This action left a series of small dot-shaped chips in the surface. The pattern of dots created the desired image, in a manner resembling modern dot-matrix printing.
|
|
Copper Wheel Engraving
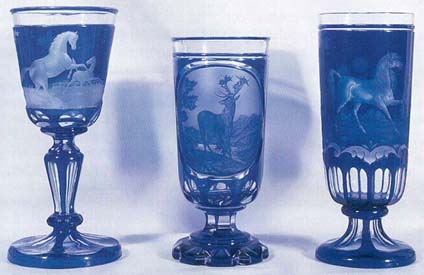
This method of engraving glass utilized a kick-wheel spindle apparatus, which turned a copper disk. The copper disk, usually the size of a dime, was used as a cutting device to engrave designs onto glass. An abrasive liquid was dripped onto the disk to cut down on friction, and this liquid grit, which coated the disk, did the actual cutting. There are two different types of copper wheel engraving, surface cut (Figure 4, right) and deep cut, also known as intaglio (Figure 4, middle).
Surface Cut
The surface cut is done completely with the disk and is limited to shallow cuts. It was impractical to make wide or deep cuts with the copper disc alone because it would take a great deal of time.
Deep Cut
The deep cut (intaglio) involved the use of both stone wheels and copper disks. The areas designated by the artist for deep and wide cuts were first routed out with a stone wheel. The stone wheel could cut through large areas of glass very quickly and easily. Next, the fine details would be engraved with the copper disk. This combination of methods resulted in great quality by taking advantage of the best aspects of both. The very deep cutting provided a three-dimensional effect which the surface cut could not.
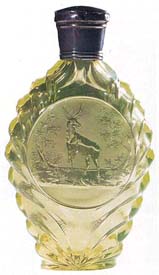
Pocket flask, c. 1850, polished wheel cut, uranium glass.
Overlays
When glass has been manufactured in two layers, such as blue over clear, different effects can be created by wheel cutting. One is known as cut to clear, and the other is cameo cut, which is also known as lithophane glass.
Cut to Clear
This method is the same as it would be done on a single color piece, except that the areas not cut by the disc remain the color of the overlay, providing great contrast (Figure 2, left).
Cameo Cut
The cameo cut utilizes the color of the overlay even more than the cut to clear method does. The cameo cut involves cutting away the background to the clear layer underneath and leaving the scene to show in the overlay color. The subject is cut to different depths in the outer layer only, creating various shades of the outer layerĺs color. (Figures 1 and 2, center) These various shades contrasted with the clear layer underneath to create a photo-like engraved image. Few cutters had the ability and experience to execute this method of decoration successfully, so cameo cut pieces are rare and expensive.
Sometimes, copper wheel cutting is supplemented by polishing the cut (Figure 3). When the copper disc cuts into the surface, it leaves a frosted finish. On occasion, the artist would polish part or all of the cut design to create a shiny contrast.
Stone Wheel Grinding (Cut Glass)
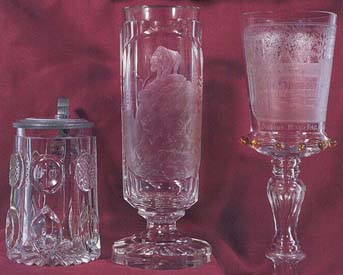 |
Stone wheel cutting was never used for pictorial scenes. Its purpose instead was to create multi-faceted patterns with a sparkling effect. This is why such decoration is also known as cut glass (Figure 4, left). After the cutting was completed, the grooves and cuts were polished to an even sheen to match the rest of the body. Polishing was done using a polishing compound known as pumice and spinning pads.
Acid Etching
Hydrofluoric acid was used in this decorating method. Areas of glass not intended for decoration were protected using wax, varnish, tar or grease. The unprotected areas were either dipped into or brushed with the acid which etched the glass, giving the surface a pitted, frosted look. The depth of the etching depended on the length of time the glass was left in the acid. This decorating process was usually used on all types of clear glass. An acid etched design is easily recognizable due to its frosted appearance.
__________
*Reprinted from The Beer Stein Journal, May 1995, by permission from Gary Kirsner Auctions.
![]()